This blog documents how to convert audiobooks on CD to Apple M4B format with chapters and proper tag metadata. You can use the same IpodABC tool to create chaptered audiobooks from aac/m4a or mp3 sources if you prefer.
Ipod's treat audiobooks files specially, and as well as being bookmarkable by default they appear in their own menu structure separate from music and podcasts.
More useful for books is that playback position is retained even if you play some other tracks in the interim, and that chapters can be defined to aid navigation to a particular place
As Apple do not use the mpeg4 standards for chapters there are limited ways to create your audiobooks to similar standards to those you can buy from itunes or elsewhere.
Simple conversions to an audiobook format are possible, (as simple as renaming a file on windows) but unless you can define chapters you either have a huge monolithic file, or have a book as a set of little files that you must play in the right order.
I found useful discussion in various places (see links for some), and two or three commercial tools for doing a decent conversion, but having tracked down suitable tools I decided to document the process.
There are three posts you need to follow.
I) SETUP the tools
II) RIP the CD's to disk (using Foobar2000 & Nero Encoder)
or RIP the CD's to disk (using itunes)
III) CONVERT the files on disk to a single audiobook.
(Last updated December 2009 - posting dates are faked so that you can easily see posts in the archive on the right.)
Saturday, July 25, 2009
Thursday, July 23, 2009
CD's to M4B - I) SETUP
This is for Windows users ... if you have a Mac or Linux try elsewhere.
This post covers how to to install and setup software to rip your audio CD (or a set of them) to a single AAC/M4A or M4B file that includes Apple chapter marks and allows bookmarking on your ipod.
(The files are still standard aac files, so they will play on most other modern mp4 audio players, including platforms like a Nokia phone, but the chapters are only available on ipods)
There are other ways, but IMHO this is the best. NeroAAC is a better encoder than other free to use alternatives AFAIK, and while you can use the itunes CD ripper functionality in place of Nero/foobar, I had some trouble with that making M4[A,B] files that other software would properly recognise the title/picture tags on.
It uses all free software, the Nero AAC encoder, the foobar2000 player to rip cd's to an aac file (with an mp4 suffix), we then use iPodABC and to convert these files to an m4b file with Apple proprietary chapters. (You can see other sites for the minor differences between mp4 audio files, aac files Apples m4a and m4b formats - the short answer is that they are the same.)
SETUP
1) Download and install ipodABC [alt http://min.us/msNWBdY0Z] - this is the key tool to the process of making "proper" audiobooks. Save the file and launch it and let Windows install it for you using its default settings.
2) You also need Slideshow Assembler. SSA is another piece of free software. Once you have installed this you can just let ipodABC use it for you. You only need the basic program, not the additonal front end. Download and run the installer program and run it.
If you want to use itunes to rip the cd's (or perhaps you already imported them) then you can skip the remaining steps. But there's nothing to stop you having foobar2000 installed as well as itunes.
3) Download the NeroAACEncoder, this comes as a ZIP archive and you need to copy or extract the neroAacEnc.exe from the win32 directory and put in the ipodABC directory (normally c:\Program Files\IpodAbc).
(I suggest c:\Program Files\NeroAAC - but anywhere you want to keep it will do.) If you don't have WinZip or a free zip file manager installed Windows XP or above will let you open and unextract the archive.) [details to be added]
4) Download and install foobar2000 (just download and run, and install it with its default settings).
5) Now start foobar2000 from your programs list, we will configure it to make subsequent ripping of audio cd's easier. (It asks on first run what layout style you want - the default option will do fine.)
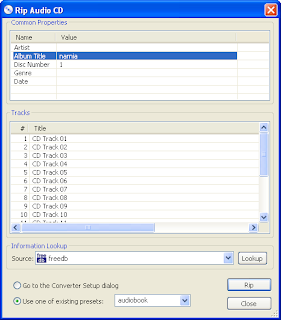
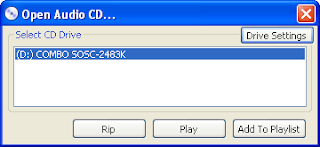
Slap an audio cd in your cd drive (any one will do) and chose "Open Audio CD... " from the File menu. Then from the new box that pops up chose "Rip"
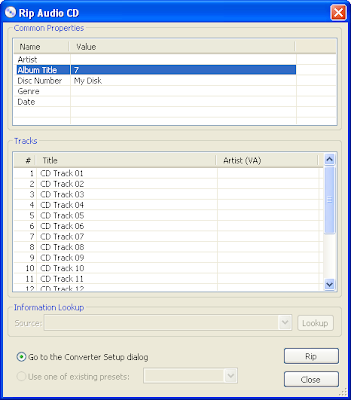
6) In the Rip Audio CD box that pops up you can add a dummy value for Album Title and Disk Number. Say "My Disk" and "7" as in the picture here.
Then make sure that the option "Go to the Converter Setup dialog" is checked and then press "Rip".
A transient window will popup saying Updating Files as foobar2000 gets ready to rip and then you will see the Converter Setup window.
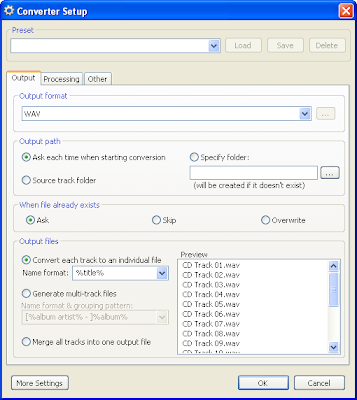
7) Select the entry that starts "MP4 (Nero)" from the dropdown list in the Output Format area at the top of the window. You can then bring up the settings dialog box by clicking on the three dots to the right of the drop down list. You will then see yet another popup for the Commandline Encoder Settings.
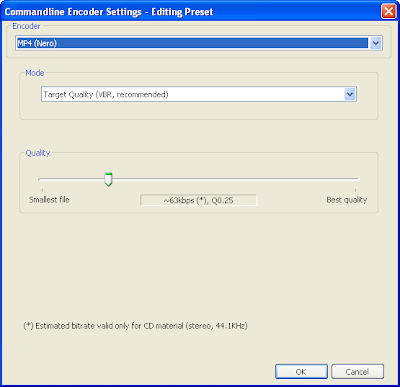
8) Adjust the Quality slider.
I suggest a Q value of 0.25, for about 63kbs as in the picture above, or slightly lower values such as 0.20 or 0.15 (about 32kbs).
These should be quite adequate for encoding spoken word recordings, as there is less detail than in a typical music track. You can use any value, but a Q 0.05 is probably the lowest you can go to. Smaller Q values will give you smaller files, but with some reduced quality.
Whatever you chose it's easiest to set it here, then use the same settings for all of the CD's that you rip for any one audiobook. I (have not tried mixing different qualities in one book)
You can get back to these settings by chosing "go to Convert Setup" when you go to rip and audio CD.
(MP4 files are of higher quality than MP3 files of the same bitrate as the AAC encoder is more efficient - especially at lower bit rates.)
If you want to play back some files to listen to the quality before you rip a whole set of CD's you can play them back on your PC as a test. If they do not play properly when you doubleclick on them you can drag and drop them into the main window of foobar2000, then click on the foobar2000 play button.
9) Click OK and that window disappears, you should now see the Converter Setup window again (it was still underneath).
Check the option to "Specify Folder" in the Output Path area and then click on the three dots to the right of the path to bring up a dialog box to chose an output folder. I like to go to My Documents then below that My Music where I create a folder called RIPS.
Now set the format for the Output Files in the lowest pane. Select "Convert each track to an individual file".
You now need to set the name format. We can specify a directory named for the cd title in question, and then each track named like "disk NN track NN". The default is just track title.
To set a different directory for each set of CD's the easiest way is to delete the current text and cut and paste the string here instead.
The window should now look something like this:
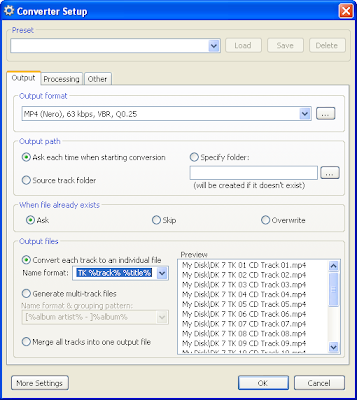
I had named my CD as the album "My Disk" and disk number as 7.
You will see the effect of the format string on the tracks of your current CD in the area on the right. The most important thing here is that you are able to sort the files by name.
Since the titles of tracks default to "CD Track 01", "CD Track 02" etc the full name shown will be ALBUMNAME\DK 01 TK 01 CD Track 01 and so on.
If you typed in (or if freedb happened to give you proper track titles) - eg "Chapter 1 - The Saga Begins", or "Chapter IV Onwards They Go!" these will be saved in the title tag as well as in the name.
It's not worth leaving off the "TK %track%" part to get cleaner filenames, so stick with the setting above.
Later when converting ripped tracks to chapters within an audiobook you can rename every track sequentially, use the text from freedb (or gracenote if you use itunes), or you can even type in new text at that point.
What is a major pain later if if you can not use the names here to sort the files into the correct order.
I don't think it's worth spending a lot of time specifying the track titles, for each CD (I'm looking at a box set of 37 disks right now - with no track listing anyway).
Also in my experience I've not found freedb very complete or accurate for audiobook CD's.
Select the text in the Preset name at the top (the default is probably "[last used]", and type "audiobook" to replace it. Then hit "Save".
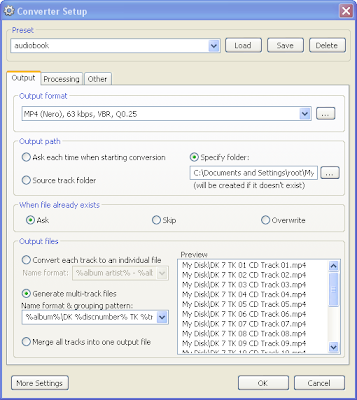
You have now defined a preset! We are nearly done...
Click OK and foobar2000 pops up a box to ask where it can find the neroaacenc program (as it has never used it before).
as you have never used the neroaacenc program with foobar we have to tell it where it is to be found. We can use the copy in C:\Program Files\ipodABC so just browse to there and click the Open button:
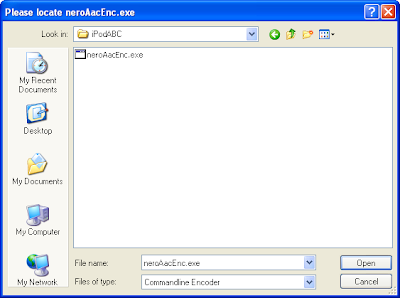
foobar2000 will start converting the CD, you can hit abort on the progress dialog (unless you want some files to practice with). You now have the tools all installed and ready to go.
Now you can do some ripping from a set of CD's ...
This post covers how to to install and setup software to rip your audio CD (or a set of them) to a single AAC/M4A or M4B file that includes Apple chapter marks and allows bookmarking on your ipod.
(The files are still standard aac files, so they will play on most other modern mp4 audio players, including platforms like a Nokia phone, but the chapters are only available on ipods)
There are other ways, but IMHO this is the best. NeroAAC is a better encoder than other free to use alternatives AFAIK, and while you can use the itunes CD ripper functionality in place of Nero/foobar, I had some trouble with that making M4[A,B] files that other software would properly recognise the title/picture tags on.
It uses all free software, the Nero AAC encoder, the foobar2000 player to rip cd's to an aac file (with an mp4 suffix), we then use iPodABC and to convert these files to an m4b file with Apple proprietary chapters. (You can see other sites for the minor differences between mp4 audio files, aac files Apples m4a and m4b formats - the short answer is that they are the same.)
SETUP
1) Download and install ipodABC [alt http://min.us/msNWBdY0Z] - this is the key tool to the process of making "proper" audiobooks. Save the file and launch it and let Windows install it for you using its default settings.
- UPDATE: Sometime before 2011 it seems www.sjhaley.com has sadly disappeared see http://web.archive.org/web/20090629064826/http://www.sjhaley.com/iPodABC/index.htm- and the closest trace I can find is http://sj-haley.software.informer.com/ - but there is no official download site at present. I will try and found my old copy and am hosting it here http://min.us/msNWBdY0Z for now.
- If Stephen is reading this, I hope this is OK, and please comment on where we might find it officially!
2) You also need Slideshow Assembler. SSA is another piece of free software. Once you have installed this you can just let ipodABC use it for you. You only need the basic program, not the additonal front end. Download and run the installer program and run it.
If you want to use itunes to rip the cd's (or perhaps you already imported them) then you can skip the remaining steps. But there's nothing to stop you having foobar2000 installed as well as itunes.
3) Download the NeroAACEncoder, this comes as a ZIP archive and you need to copy or extract the neroAacEnc.exe from the win32 directory and put in the ipodABC directory (normally c:\Program Files\IpodAbc).
(I suggest c:\Program Files\NeroAAC - but anywhere you want to keep it will do.) If you don't have WinZip or a free zip file manager installed Windows XP or above will let you open and unextract the archive.) [details to be added]
4) Download and install foobar2000 (just download and run, and install it with its default settings).
5) Now start foobar2000 from your programs list, we will configure it to make subsequent ripping of audio cd's easier. (It asks on first run what layout style you want - the default option will do fine.)
Slap an audio cd in your cd drive (any one will do) and chose "Open Audio CD... " from the File menu. Then from the new box that pops up chose "Rip"

6) In the Rip Audio CD box that pops up you can add a dummy value for Album Title and Disk Number. Say "My Disk" and "7" as in the picture here.
Then make sure that the option "Go to the Converter Setup dialog" is checked and then press "Rip".

A transient window will popup saying Updating Files as foobar2000 gets ready to rip and then you will see the Converter Setup window.

7) Select the entry that starts "MP4 (Nero)" from the dropdown list in the Output Format area at the top of the window. You can then bring up the settings dialog box by clicking on the three dots to the right of the drop down list. You will then see yet another popup for the Commandline Encoder Settings.

8) Adjust the Quality slider.
I suggest a Q value of 0.25, for about 63kbs as in the picture above, or slightly lower values such as 0.20 or 0.15 (about 32kbs).
These should be quite adequate for encoding spoken word recordings, as there is less detail than in a typical music track. You can use any value, but a Q 0.05 is probably the lowest you can go to. Smaller Q values will give you smaller files, but with some reduced quality.
Whatever you chose it's easiest to set it here, then use the same settings for all of the CD's that you rip for any one audiobook. I (have not tried mixing different qualities in one book)
You can get back to these settings by chosing "go to Convert Setup" when you go to rip and audio CD.
(MP4 files are of higher quality than MP3 files of the same bitrate as the AAC encoder is more efficient - especially at lower bit rates.)
If you want to play back some files to listen to the quality before you rip a whole set of CD's you can play them back on your PC as a test. If they do not play properly when you doubleclick on them you can drag and drop them into the main window of foobar2000, then click on the foobar2000 play button.
9) Click OK and that window disappears, you should now see the Converter Setup window again (it was still underneath).
Check the option to "Specify Folder" in the Output Path area and then click on the three dots to the right of the path to bring up a dialog box to chose an output folder. I like to go to My Documents then below that My Music where I create a folder called RIPS.
Now set the format for the Output Files in the lowest pane. Select "Convert each track to an individual file".
You now need to set the name format. We can specify a directory named for the cd title in question, and then each track named like "disk NN track NN". The default is just track title.
To set a different directory for each set of CD's the easiest way is to delete the current text and cut and paste the string here instead.
%album%\DK %discnumber% TK %track% %title%
The window should now look something like this:

I had named my CD as the album "My Disk" and disk number as 7.
You will see the effect of the format string on the tracks of your current CD in the area on the right. The most important thing here is that you are able to sort the files by name.
Since the titles of tracks default to "CD Track 01", "CD Track 02" etc the full name shown will be ALBUMNAME\DK 01 TK 01 CD Track 01 and so on.
If you typed in (or if freedb happened to give you proper track titles) - eg "Chapter 1 - The Saga Begins", or "Chapter IV Onwards They Go!" these will be saved in the title tag as well as in the name.
It's not worth leaving off the "TK %track%" part to get cleaner filenames, so stick with the setting above.
Later when converting ripped tracks to chapters within an audiobook you can rename every track sequentially, use the text from freedb (or gracenote if you use itunes), or you can even type in new text at that point.
What is a major pain later if if you can not use the names here to sort the files into the correct order.
I don't think it's worth spending a lot of time specifying the track titles, for each CD (I'm looking at a box set of 37 disks right now - with no track listing anyway).
Also in my experience I've not found freedb very complete or accurate for audiobook CD's.
- But, as I have noticed itunes/gracenote doing rather better thanfoobar2000/freedb I have updated this guide with details on using itunes to do the ripping.
- I use itunes if it shows useful information, but foobar/nero otherwise.
Select the text in the Preset name at the top (the default is probably "[last used]", and type "audiobook" to replace it. Then hit "Save".

You have now defined a preset! We are nearly done...
Click OK and foobar2000 pops up a box to ask where it can find the neroaacenc program (as it has never used it before).
as you have never used the neroaacenc program with foobar we have to tell it where it is to be found. We can use the copy in C:\Program Files\ipodABC so just browse to there and click the Open button:

foobar2000 will start converting the CD, you can hit abort on the progress dialog (unless you want some files to practice with). You now have the tools all installed and ready to go.
Now you can do some ripping from a set of CD's ...
Tuesday, July 21, 2009
CD's to M4B - II) RIPPING
1) Start foobar2000
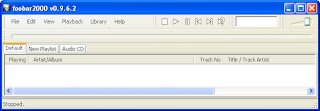
2) Put the first cd in your cd drive.
3) Click on the File menu and chose "Open Audio CD..."
A popup box displays your CD drive
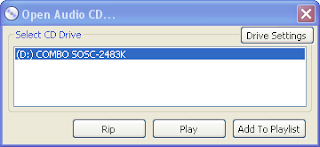
4) Click on the Rip button.
You should see a list of tracks in the window. - they won't have names (yet).
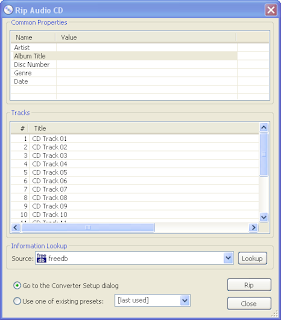
Optional - 4A) You can try clicking on the lookup button - you may be lucky enough for this to populate the cd information fields - but setting most of these is only a convenience at this stage anyway.
5) Enter the a name for Album Title and the Disk Number - it's best to use a leading zero on larger audio books - eg start with "01" rather than "1" if there are more than nine disks.
(It is easiest if you use the same short title for each cd of a book. Eg "narnia", "dr no" or "huckfinn" or "afowl-1")
Also, make sure that the converter is set to use the "audiobook" name that you defined in the setup stage.
The window should now look like this:
6) You're ready to go - click the Rip button
Each track will now be ripped to an mp4 file in a directory in My Music/RIPS (assuming you used that value when defining the audiobook preset).
Time to make a cup of tea on my system... (YMMV if you have a faster CPU)
The files will be saved in a directory for each title (narnia in the example) with a name using the disk and track number (again this is as defined in the preset you set up). This naming is important so that you can identify them easily when converting them to a chaptered audiobook.

You can clear the "Show output tracks when done" option if you wish - if you leave it set you see a window like this when the disk conversion is done.
7) OK, so you ripped one CD! Now repeat steps 1-5 for each CD in the book.
If you use the same Album Title value each time the files will all be placed in the same directory.
8) When you've ripped all your CD's you can convert those tracks to a single audiobook with a chapter for each track.

2) Put the first cd in your cd drive.
3) Click on the File menu and chose "Open Audio CD..."
A popup box displays your CD drive

4) Click on the Rip button.
You should see a list of tracks in the window. - they won't have names (yet).

Optional - 4A) You can try clicking on the lookup button - you may be lucky enough for this to populate the cd information fields - but setting most of these is only a convenience at this stage anyway.
5) Enter the a name for Album Title and the Disk Number - it's best to use a leading zero on larger audio books - eg start with "01" rather than "1" if there are more than nine disks.
(It is easiest if you use the same short title for each cd of a book. Eg "narnia", "dr no" or "huckfinn" or "afowl-1")
Also, make sure that the converter is set to use the "audiobook" name that you defined in the setup stage.
The window should now look like this:
6) You're ready to go - click the Rip button
Each track will now be ripped to an mp4 file in a directory in My Music/RIPS (assuming you used that value when defining the audiobook preset).
Time to make a cup of tea on my system... (YMMV if you have a faster CPU)
The files will be saved in a directory for each title (narnia in the example) with a name using the disk and track number (again this is as defined in the preset you set up). This naming is important so that you can identify them easily when converting them to a chaptered audiobook.

You can clear the "Show output tracks when done" option if you wish - if you leave it set you see a window like this when the disk conversion is done.
7) OK, so you ripped one CD! Now repeat steps 1-5 for each CD in the book.
If you use the same Album Title value each time the files will all be placed in the same directory.
8) When you've ripped all your CD's you can convert those tracks to a single audiobook with a chapter for each track.
Monday, July 20, 2009
CD's to M4B - IIa) RIPPING using iTunes (rather than foobar/nero)
Here is an alternative way to rip your CD's ready to make audiobooks.
You can use itunes to do the conversion to m4a files, then use Ipod Audiobook Converter as before.
The advantages over the Foobar2000/Nero method are that it is slightly simpler, (especially in the actual CD handling) and that itunes uses the Gracenote CD track name database. If you have masses of disks to convert - and a spouse or child willing to work through them itunes has some strong benefits if you set it to import on disk entry, and eject when done.
The disadvantage is that it uses the apple itunes encoder - which may not be as good as the nero version. It does not seem as flexible. Also you need to delete the originally imported files from itunes - or life is confusing. And yo don't have so much control over where itunes stores the riupped files.
Gracenote often seems more complete better than freedb as used by foobar2000, but it's not an open system. Some of my audiobook CD's show up with chapter (track) names in itunes, but not in foobar2000.
As newer ipods (at least nano v3, Classic?) will show not only chapter points - but also the chapter names , if you can get the chapter names embedded they would be nice to have.
My 5.5G ipod does not show names, but a nano 3G does.
So here is how to rip your CD's using itunes.
1) iTunes and Setup
I'll assume (as you want to make m4b ipod audiobooks) that you have iTunes installed.
If not - you can get it from Apple here: http://apple.com/itunes/download
Go to your Edit menu and chose the Preferences entry (it's right at the bottom)
On the General tab, you will see some options below "When you insert a CD"


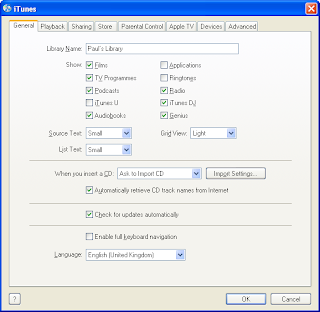 Make sure that "Automatically retrieve CD track names from Internet" is checked (as shown).
If you have many CDs to rip you may like to change "Ask to Import CD" to "Import CD and Eject".
What is more important is to edit the "Import Settings" so that they are suitable for an audiobook.
(You may want to set these back to higher rates for music CDs once you are done.)
Import Settings
When you've finished setting the import settings it should look like this
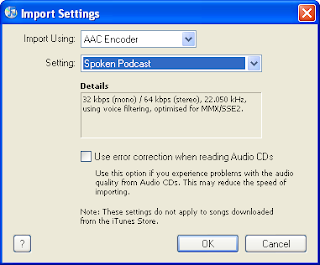 If not, select "AAC Encoder" from the first drop down box, and then chose "Spoken Podcast" from the box below.
You probably needn't bother about the error correction option.
If you wanted to you could use some custom settings for the AAC encoder - but iTunes doesnot give as much control as the Nero encoder. If you select Custom you get a box like this one: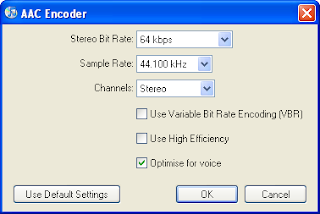
You can see the track listing for the CD The Thirteenth Stone in the example above.
3) Eject the CD (if needed) and Repeat Step 2 ...
C:\Documents and Settings\USERNAME\My Documents\My Music\iTunes\iTunes Music\Music\ARTIST\ALBUMNAME
Username is your windows username, ARTIST and ALBUMNAME are taken from the CD details.
4) Continue to Audiobook Creation ...
But see also the notes on itunes cleanup ...
(One consequence of using itunes is that all of the CD's are not only ripped to m4a files, but they will appear as a set of separate tracks in the itunes library. If you convert them to a single file Audiobook and add that file to your library you will probably want to delete the original separate files.)

You can use itunes to do the conversion to m4a files, then use Ipod Audiobook Converter as before.
The advantages over the Foobar2000/Nero method are that it is slightly simpler, (especially in the actual CD handling) and that itunes uses the Gracenote CD track name database. If you have masses of disks to convert - and a spouse or child willing to work through them itunes has some strong benefits if you set it to import on disk entry, and eject when done.
The disadvantage is that it uses the apple itunes encoder - which may not be as good as the nero version. It does not seem as flexible. Also you need to delete the originally imported files from itunes - or life is confusing. And yo don't have so much control over where itunes stores the riupped files.
Gracenote often seems more complete better than freedb as used by foobar2000, but it's not an open system. Some of my audiobook CD's show up with chapter (track) names in itunes, but not in foobar2000.
As newer ipods (at least nano v3, Classic?) will show not only chapter points - but also the chapter names , if you can get the chapter names embedded they would be nice to have.
My 5.5G ipod does not show names, but a nano 3G does.
So here is how to rip your CD's using itunes.
1) iTunes and Setup
I'll assume (as you want to make m4b ipod audiobooks) that you have iTunes installed.
If not - you can get it from Apple here: http://apple.com/itunes/download
Go to your Edit menu and chose the Preferences entry (it's right at the bottom)
On the General tab, you will see some options below "When you insert a CD"


 Make sure that "Automatically retrieve CD track names from Internet" is checked (as shown).
If you have many CDs to rip you may like to change "Ask to Import CD" to "Import CD and Eject".
What is more important is to edit the "Import Settings" so that they are suitable for an audiobook.
(You may want to set these back to higher rates for music CDs once you are done.)
Import Settings
When you've finished setting the import settings it should look like this
 If not, select "AAC Encoder" from the first drop down box, and then chose "Spoken Podcast" from the box below.
You probably needn't bother about the error correction option.
If you wanted to you could use some custom settings for the AAC encoder - but iTunes doesnot give as much control as the Nero encoder. If you select Custom you get a box like this one:

2) Rip (Import) the CD
Pop the CD in the drive. The CD track details will be displayed if itunes can find it in Gracenote.
If you chose ask you will see a popup like this, asking if you want to import it.
Click Yes.

Alternatively you can click on the Import CD button in the bottom right hand corner of the main itunes window.
(itunes uses the term Import rather than Rip, but they mean almost the same thing.)
Pop the CD in the drive. The CD track details will be displayed if itunes can find it in Gracenote.
If you chose ask you will see a popup like this, asking if you want to import it.
Click Yes.

Alternatively you can click on the Import CD button in the bottom right hand corner of the main itunes window.
(itunes uses the term Import rather than Rip, but they mean almost the same thing.)
You can see the track listing for the CD The Thirteenth Stone in the example above.
3) Eject the CD (if needed) and Repeat Step 2 ...
- You are prompted for name and track details if Gracenote doesn't recognise a CD.
- Itunes might eject the disk automatically when it is finished importing.
C:\Documents and Settings\USERNAME\My Documents\My Music\iTunes\iTunes Music\Music\ARTIST\ALBUMNAME
Username is your windows username, ARTIST and ALBUMNAME are taken from the CD details.
4) Continue to Audiobook Creation ...
But see also the notes on itunes cleanup ...
(One consequence of using itunes is that all of the CD's are not only ripped to m4a files, but they will appear as a set of separate tracks in the itunes library. If you convert them to a single file Audiobook and add that file to your library you will probably want to delete the original separate files.)

Sunday, July 19, 2009
CD's to M4B - III) CONVERTING
The final stage is to convert the ripped (MP4 or M4A) audio files into an M4B file. As the files are already encoded to the same standard this is quite fast. You will confirm chapter and title names and can provide a cover image. (See the note at the end of this posting if you have a very long book).
1) Start up Ipod ABC from your programs menu.
Here's what it looks like: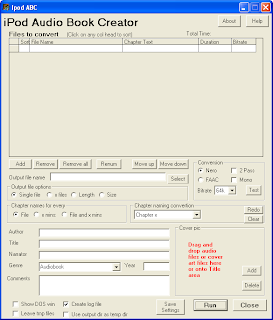

2) Now you need to add the file you ripped from each CD.
You can drag and drop them in to the window (use the red target area)
If you used itunes to import your disks you will find the m4a files somewhere like this:
C:\Documents and Settings\USERNAME\My Documents\My Music\iTunes\iTunes Music\Music
Alternatively click on the Add button to display a popup window. When you reach the correct directory where you placed all the files select all the files (ctrl-A will do this or use shift & left mouse-click on the first and last) - the dialog box it should then look like this:
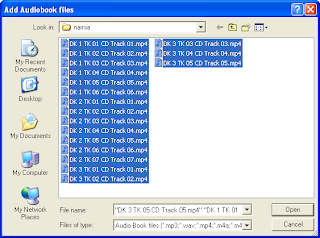
Make sure you haven't missed any chapters!
3) Now you should have a list of the component files in ipodABC like this
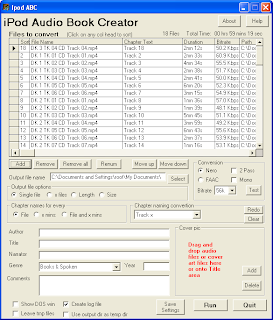
4) Above the list of files click on the "File Name" column heading to sort them by name.
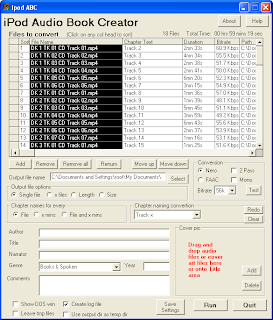
5) Double check that the files are in the correct order!
6) In the lower part of the window fill in the values for Title, Year, Genre etc as you wish.
My experience/opinion is that the Author and Narrator fields are best reversed.
E.g. for Paddington Bear read by Stephen Fry written by Michael Bond place Stephen Fry in the Author box - this maps into the Artist value in itunes and your ipod.
Place Michael Bond in the Narrator field, this maps into Composer in iTunes/ipod.
Note: IpodABC sets the Album tag to the same as the Title, but itunes/ipods don't use this anyway for Audiobooks. (It could be reset later via other tools if you want - say to the name of a book series - like James Bond.)
7) You can add a small jpg picture (say of the book or audio book cover) you can drag this to the target area or add that via the button. This image will be shown when you are browsing by CoverFlow on your (newer) ipod, and in itunes if you use it.
The output file will be placed in the same directory as the input files by default.
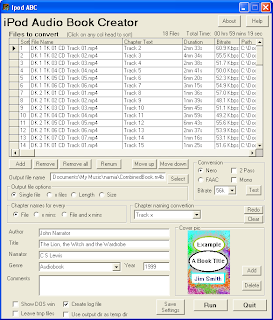
(Picture size does not seem to matter - but images that are about 300x200 pixels and about 40-100k in size seem a good compromise.)
8) If all is in order you can kick off the conversion by clicking on the Run button.
You are offered the chance to alter the output filename if you want.
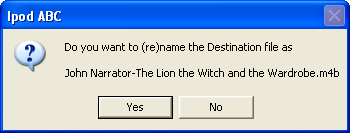
Here we go ...
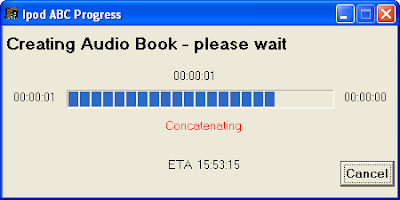
When finished if you elect to open the file it will be opened with whatever program is assigned to handle m4b files - probably itunes if you have it installed.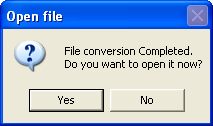
I usually select No as I will test it next anyway.
You can move the m4b file to a suitable location - "My Audiobooks" say and then add it to your itunes/ipod library in the usual way (e.g. by dragging it into the itunes window).
Your file has a cover, chapters and will be bookmarkable without extra changes. Yee Ha!
It will appear alongside any other audiobooks in the appropriate pane of itunes or your ipod menus.
If you display your audiobook's info properties you can fine tune its details.
(right click on it or use the File menu and chose Get Info)
If I have a set of books (eg Harry Potter, or Alex Rider) I like to use that suitable common name as the Album value (it defaults to the same as the Title). While iTunes doesn't actually use the album for sorting audio books (bah humbug), some other software does.
(I use MediaMonkey to manage my audio files and load them onto my ipod.)
As well as setting Album to say "Harry Potter", I set the sorting name to something like "Harry Potter 2 - Harry Potter and the Chamber of Secrets" - so that they are displayed in order.
You can also use the Sort Title field here (under sorting) so that they are displayed in the right order.
9) Cleanup!
If you test your combined audiobook and all is well you can delete the ripped files as they are no longer needed.
Note: Conversion Settings for MP3 Source Files
When you use m4a files (or any in the aac format), as specified here, ipodABC does not need to convert them - it just copies the content. So for us the settings under conversion are not used. Your audiobook will be at the same bitrate as you created the files with when you ripped it.
You can convert mp3 files to m4b, but the quality is degraded when you copy from one lossy format to another. That said if you convert downwards say a 128kb/s mp3 to a 64kbs m4b you are reducing quality anyway. 64 or even 32kbs m4b is easily enough for spoken word. Quality audio plays (say the Hitch Hiker's Guide to the Galaxy) benefit from higher rates, and music even more so.
Note: Ipod Chapters
Ipod chapters allow you to skip forward or backward in a single audiobook. Ipod Nano (and presumably Classic) also show chapter names, whereas my 5th Gen Video only shows marks on an overall visual scale.
If your CD's split chapters into separate tracks - ie if CD tracks were of the form Chapter 1 part 1, Chapter 1, part 2 etc you may want to alter the Chapter Naming Convention. (Older ipods don't display the chapter names anyway.)
You can have each track named Part 1 to Part 9 or whatever; the Other value allows you to use some arbitrary text with a sequential number.
If you want to include arbitrary text it's best to have had foobar name the files that way.
Eg Chapter 1 - The Boy Who Lived (Part 1) .
OR if you have used itunes to rip the files you can use the the id3 title tag.
This has the advantage over the filenames that you can use characters such as double quote and question marks (and that hopefully some other Gracenote user already did the donkey work for you).
You can also type in (or correct existing) chapter names in the window.
You can have IpodABC make chapter settings every so many minutes if you want, and/or keep them for every file. But there is no way to join several files (eg several tracks that make up one chapter) in IpodABC - so if you wanted to do this you have to do it in foobar2000 or as an intermediate step.
Note: Very Long Books
One issue to consider here is that for very long books some ipods may throw a wobbly.
IpodABC will warn you if this is a possible issue. (You may like to try anyway as I am not sure if this is still a live problem on the latest ipods). See here and here for some details.
So if your book is more than say 10 hours long it will be best to split it into two volumes. As far as itunes/ipods are aware these will be separate books.
(I would title these something like "Harry Potter 7 chaps 1-10" and "Harry Potter 7 chaps 10-20")
- This example uses files with an mp4 suffix but you can use itunes created m4a files in the same way.
1) Start up Ipod ABC from your programs menu.
Here's what it looks like:


2) Now you need to add the file you ripped from each CD.
You can drag and drop them in to the window (use the red target area)
If you used itunes to import your disks you will find the m4a files somewhere like this:
C:\Documents and Settings\USERNAME\My Documents\My Music\iTunes\iTunes Music\Music
Alternatively click on the Add button to display a popup window. When you reach the correct directory where you placed all the files select all the files (ctrl-A will do this or use shift & left mouse-click on the first and last) - the dialog box it should then look like this:

Make sure you haven't missed any chapters!
3) Now you should have a list of the component files in ipodABC like this

4) Above the list of files click on the "File Name" column heading to sort them by name.

5) Double check that the files are in the correct order!
6) In the lower part of the window fill in the values for Title, Year, Genre etc as you wish.
My experience/opinion is that the Author and Narrator fields are best reversed.
E.g. for Paddington Bear read by Stephen Fry written by Michael Bond place Stephen Fry in the Author box - this maps into the Artist value in itunes and your ipod.
Place Michael Bond in the Narrator field, this maps into Composer in iTunes/ipod.
Note: IpodABC sets the Album tag to the same as the Title, but itunes/ipods don't use this anyway for Audiobooks. (It could be reset later via other tools if you want - say to the name of a book series - like James Bond.)
7) You can add a small jpg picture (say of the book or audio book cover) you can drag this to the target area or add that via the button. This image will be shown when you are browsing by CoverFlow on your (newer) ipod, and in itunes if you use it.
The output file will be placed in the same directory as the input files by default.

(Picture size does not seem to matter - but images that are about 300x200 pixels and about 40-100k in size seem a good compromise.)
8) If all is in order you can kick off the conversion by clicking on the Run button.
You are offered the chance to alter the output filename if you want.

Here we go ...

When finished if you elect to open the file it will be opened with whatever program is assigned to handle m4b files - probably itunes if you have it installed.

I usually select No as I will test it next anyway.
You can move the m4b file to a suitable location - "My Audiobooks" say and then add it to your itunes/ipod library in the usual way (e.g. by dragging it into the itunes window).
Your file has a cover, chapters and will be bookmarkable without extra changes. Yee Ha!
It will appear alongside any other audiobooks in the appropriate pane of itunes or your ipod menus.
If you display your audiobook's info properties you can fine tune its details.
(right click on it or use the File menu and chose Get Info)
If I have a set of books (eg Harry Potter, or Alex Rider) I like to use that suitable common name as the Album value (it defaults to the same as the Title). While iTunes doesn't actually use the album for sorting audio books (bah humbug), some other software does.
(I use MediaMonkey to manage my audio files and load them onto my ipod.)
As well as setting Album to say "Harry Potter", I set the sorting name to something like "Harry Potter 2 - Harry Potter and the Chamber of Secrets" - so that they are displayed in order.
You can also use the Sort Title field here (under sorting) so that they are displayed in the right order.
9) Cleanup!
If you test your combined audiobook and all is well you can delete the ripped files as they are no longer needed.
Note: Conversion Settings for MP3 Source Files
When you use m4a files (or any in the aac format), as specified here, ipodABC does not need to convert them - it just copies the content. So for us the settings under conversion are not used. Your audiobook will be at the same bitrate as you created the files with when you ripped it.
You can convert mp3 files to m4b, but the quality is degraded when you copy from one lossy format to another. That said if you convert downwards say a 128kb/s mp3 to a 64kbs m4b you are reducing quality anyway. 64 or even 32kbs m4b is easily enough for spoken word. Quality audio plays (say the Hitch Hiker's Guide to the Galaxy) benefit from higher rates, and music even more so.
Note: Ipod Chapters
Ipod chapters allow you to skip forward or backward in a single audiobook. Ipod Nano (and presumably Classic) also show chapter names, whereas my 5th Gen Video only shows marks on an overall visual scale.
If your CD's split chapters into separate tracks - ie if CD tracks were of the form Chapter 1 part 1, Chapter 1, part 2 etc you may want to alter the Chapter Naming Convention. (Older ipods don't display the chapter names anyway.)
You can have each track named Part 1 to Part 9 or whatever; the Other value allows you to use some arbitrary text with a sequential number.
If you want to include arbitrary text it's best to have had foobar name the files that way.
Eg Chapter 1 - The Boy Who Lived (Part 1) .
OR if you have used itunes to rip the files you can use the the id3 title tag.
This has the advantage over the filenames that you can use characters such as double quote and question marks (and that hopefully some other Gracenote user already did the donkey work for you).
You can also type in (or correct existing) chapter names in the window.
You can have IpodABC make chapter settings every so many minutes if you want, and/or keep them for every file. But there is no way to join several files (eg several tracks that make up one chapter) in IpodABC - so if you wanted to do this you have to do it in foobar2000 or as an intermediate step.
Note: Very Long Books
One issue to consider here is that for very long books some ipods may throw a wobbly.
IpodABC will warn you if this is a possible issue. (You may like to try anyway as I am not sure if this is still a live problem on the latest ipods). See here and here for some details.
So if your book is more than say 10 hours long it will be best to split it into two volumes. As far as itunes/ipods are aware these will be separate books.
(I would title these something like "Harry Potter 7 chaps 1-10" and "Harry Potter 7 chaps 10-20")
Wednesday, July 8, 2009
Itunes Cleanup
So, you have created an m4b audiobook file and added it to itunes.
If you used Foobar/Nero to rip the CDs to the source m4a files you can just delete whatever directory or files you used to store these.
If however you imported with itunes (either originally or by design) you now have two complete copies of the book. You can now delete the imported files.
They are easy to identify because the m4b file we made is part of the Audiobook content, the imported files are under Music by default - and the times are only a few minutes.
Here are the ones from the The Thirteenth Stone, selected (via shift & left mouse click) and ready to delete.
(The delete command can be found on the Edit menu as well as via a right click)
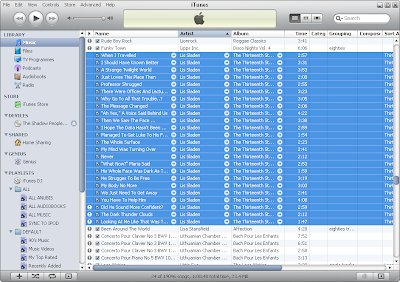
(You may notice a few files here have a ! on the left hand side of the listing. This means that itunes can not find the file in its expected location - perhaps because you already deleted it outside of itunes. You can remove these entries from your library in the same was as if there were still files.)
You will see a confirmation dialog box popup ...
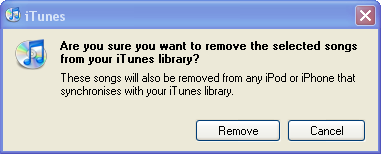
Of course we want the individual files totally removed now that we have a new copy.
Click on Remove and you will see this dialog
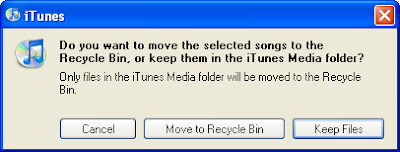
There's no reason to keep the files so click on "Move to Recycle Bin" and you are done.
If you used Foobar/Nero to rip the CDs to the source m4a files you can just delete whatever directory or files you used to store these.
If however you imported with itunes (either originally or by design) you now have two complete copies of the book. You can now delete the imported files.
They are easy to identify because the m4b file we made is part of the Audiobook content, the imported files are under Music by default - and the times are only a few minutes.
Here are the ones from the The Thirteenth Stone, selected (via shift & left mouse click) and ready to delete.
(The delete command can be found on the Edit menu as well as via a right click)

(You may notice a few files here have a ! on the left hand side of the listing. This means that itunes can not find the file in its expected location - perhaps because you already deleted it outside of itunes. You can remove these entries from your library in the same was as if there were still files.)
You will see a confirmation dialog box popup ...

Of course we want the individual files totally removed now that we have a new copy.
Click on Remove and you will see this dialog

There's no reason to keep the files so click on "Move to Recycle Bin" and you are done.
Tuesday, July 7, 2009
Some alternative options and information
http://www.sjhaley.com/ipodabc/index.htm - home of Ipod AudoBook Conveter (IpodABC)
http://www.jrlearnsmedia.com/blog/archive/2007/07/29/enhanced-podcasting-on-windows.aspx - home of Slide Show Assembler (SSA)
http://guide-convert-audiocds-toipod-files.blogspot.com/ - does not cover chapters, but a duplicate of some material from ilounge
ilounge is the most informative forum I found for this kind of material, but some posts can be quite old so look at the date of posting and consider if things may have changed
http://forums.ilounge.com/showthread.php?t=202606 - how to add chapters by hand using SSA but without using ipodABC
http://forums.ilounge.com/showthread.php?s=&postid=888433 - FAQs & Helpful Links for iPodders interested in Audio Books
Shareware/Trialware/Commercial Options
http://www.splasm.com/audiobookbuilder/ - Audiobook Builder ($10)
http://rightwordsoft.com/products/chaptermaster/default.php - Chapter Master ($15)
http://rightwordsoft.com/products/markable/default.php - Markable ($18)
http://audiobook.qarchive.org - Other tools
Monday, July 6, 2009
Sunday, July 5, 2009
Easy Fixes
So suppose you have a good mp3 copy of a an audiobook.
If the quality is not good enough to want to convert it to an m4b audiobook and/or you do not have or want chapters one mp3 is almost as handy.
Since itunes 8 you can finally designate a file (say a big mp3) as an audiobook rather than a music track. So any file can now be made to be listed in the audiobook menus.
Previously the best possible option was to tell itunes (and hence your ipod) that the playback position for a file should be remembered (so that if you play partway through a book - then play some music - when you return to the book it continues, rather than starting it afresh).
Audiobooks have this remember playback position property set by default, as well as not being played in random selections.
So if your audiobook is one mp3 files you can alter this property or designate it as an audiobook via the info dialog.
Display a file's info properties by a right click on it then select Get Info in the pop up menu.
(Or you can use the File menu and chose Get Info)
Under the Options tab you can update the file type, or just set remember playback.
You can update the value for many files at once in this way, but if you copy the files to another PC these add on settings will not be recognised.
Once you make an m4b file that will be recognised as an audiobook by every ipod/itunes.
Saturday, July 4, 2009
Why iTunes Does Not Import CD Audiobooks Well
If you take say a Harry Potter audiobook on 7 CD's, each with 30 or more tracks your can import these into iTunes - but it handles these as the same a set of music tracks.
You can adjust the import settings to use a lower bitrate for a smaller file size (as the spoken word can be compressed more than music) but itunes does not handle CD audiobooks very well.
If you are lucky it will play each disk and track in the right order, (you may need to create custom playlists to do this easily), and it's unlikely that you will ever want a selection of these "tracks" played in a random order with your music.
Audiobooks purchased or downloaded from the store are found in their own section of itunes. These are recognised not by the Genre property but by being in m4b files rather than m4a (regular music and imported CDs) or m4p (DRM protected music files). All of these type are essentially the same using the AAC compression type of the mpeg 4 standard.
You can convert your CDs using itunes or other programs to a set of m4a files, then combine these into a m4b audiobook file.
Subscribe to:
Comments (Atom)
