This post covers how to to install and setup software to rip your audio CD (or a set of them) to a single AAC/M4A or M4B file that includes Apple chapter marks and allows bookmarking on your ipod.
(The files are still standard aac files, so they will play on most other modern mp4 audio players, including platforms like a Nokia phone, but the chapters are only available on ipods)
There are other ways, but IMHO this is the best. NeroAAC is a better encoder than other free to use alternatives AFAIK, and while you can use the itunes CD ripper functionality in place of Nero/foobar, I had some trouble with that making M4[A,B] files that other software would properly recognise the title/picture tags on.
It uses all free software, the Nero AAC encoder, the foobar2000 player to rip cd's to an aac file (with an mp4 suffix), we then use iPodABC and to convert these files to an m4b file with Apple proprietary chapters. (You can see other sites for the minor differences between mp4 audio files, aac files Apples m4a and m4b formats - the short answer is that they are the same.)
SETUP
1) Download and install ipodABC [alt http://min.us/msNWBdY0Z] - this is the key tool to the process of making "proper" audiobooks. Save the file and launch it and let Windows install it for you using its default settings.
- UPDATE: Sometime before 2011 it seems www.sjhaley.com has sadly disappeared see http://web.archive.org/web/20090629064826/http://www.sjhaley.com/iPodABC/index.htm- and the closest trace I can find is http://sj-haley.software.informer.com/ - but there is no official download site at present. I will try and found my old copy and am hosting it here http://min.us/msNWBdY0Z for now.
- If Stephen is reading this, I hope this is OK, and please comment on where we might find it officially!
2) You also need Slideshow Assembler. SSA is another piece of free software. Once you have installed this you can just let ipodABC use it for you. You only need the basic program, not the additonal front end. Download and run the installer program and run it.
If you want to use itunes to rip the cd's (or perhaps you already imported them) then you can skip the remaining steps. But there's nothing to stop you having foobar2000 installed as well as itunes.
3) Download the NeroAACEncoder, this comes as a ZIP archive and you need to copy or extract the neroAacEnc.exe from the win32 directory and put in the ipodABC directory (normally c:\Program Files\IpodAbc).
(I suggest c:\Program Files\NeroAAC - but anywhere you want to keep it will do.) If you don't have WinZip or a free zip file manager installed Windows XP or above will let you open and unextract the archive.) [details to be added]
4) Download and install foobar2000 (just download and run, and install it with its default settings).
5) Now start foobar2000 from your programs list, we will configure it to make subsequent ripping of audio cd's easier. (It asks on first run what layout style you want - the default option will do fine.)
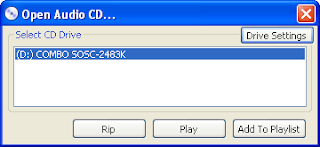
Slap an audio cd in your cd drive (any one will do) and chose "Open Audio CD... " from the File menu. Then from the new box that pops up chose "Rip"
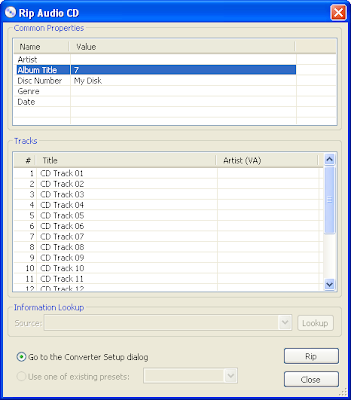
6) In the Rip Audio CD box that pops up you can add a dummy value for Album Title and Disk Number. Say "My Disk" and "7" as in the picture here.
Then make sure that the option "Go to the Converter Setup dialog" is checked and then press "Rip".
A transient window will popup saying Updating Files as foobar2000 gets ready to rip and then you will see the Converter Setup window.
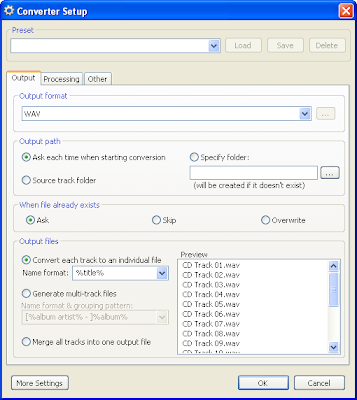
7) Select the entry that starts "MP4 (Nero)" from the dropdown list in the Output Format area at the top of the window. You can then bring up the settings dialog box by clicking on the three dots to the right of the drop down list. You will then see yet another popup for the Commandline Encoder Settings.
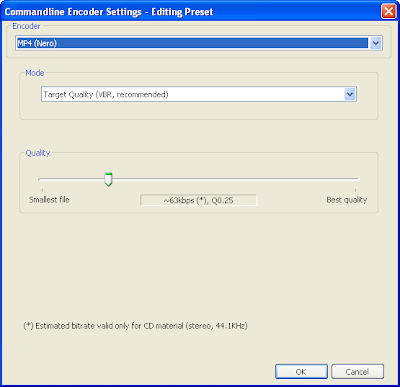
8) Adjust the Quality slider.
I suggest a Q value of 0.25, for about 63kbs as in the picture above, or slightly lower values such as 0.20 or 0.15 (about 32kbs).
These should be quite adequate for encoding spoken word recordings, as there is less detail than in a typical music track. You can use any value, but a Q 0.05 is probably the lowest you can go to. Smaller Q values will give you smaller files, but with some reduced quality.
Whatever you chose it's easiest to set it here, then use the same settings for all of the CD's that you rip for any one audiobook. I (have not tried mixing different qualities in one book)
You can get back to these settings by chosing "go to Convert Setup" when you go to rip and audio CD.
(MP4 files are of higher quality than MP3 files of the same bitrate as the AAC encoder is more efficient - especially at lower bit rates.)
If you want to play back some files to listen to the quality before you rip a whole set of CD's you can play them back on your PC as a test. If they do not play properly when you doubleclick on them you can drag and drop them into the main window of foobar2000, then click on the foobar2000 play button.
9) Click OK and that window disappears, you should now see the Converter Setup window again (it was still underneath).
Check the option to "Specify Folder" in the Output Path area and then click on the three dots to the right of the path to bring up a dialog box to chose an output folder. I like to go to My Documents then below that My Music where I create a folder called RIPS.
Now set the format for the Output Files in the lowest pane. Select "Convert each track to an individual file".
You now need to set the name format. We can specify a directory named for the cd title in question, and then each track named like "disk NN track NN". The default is just track title.
To set a different directory for each set of CD's the easiest way is to delete the current text and cut and paste the string here instead.
%album%\DK %discnumber% TK %track% %title%
The window should now look something like this:
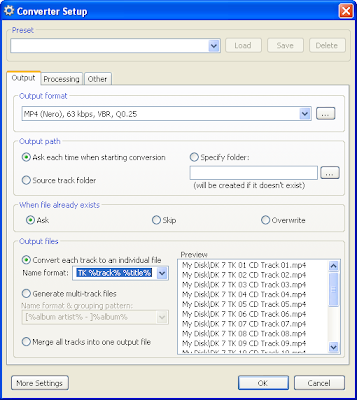
I had named my CD as the album "My Disk" and disk number as 7.
You will see the effect of the format string on the tracks of your current CD in the area on the right. The most important thing here is that you are able to sort the files by name.
Since the titles of tracks default to "CD Track 01", "CD Track 02" etc the full name shown will be ALBUMNAME\DK 01 TK 01 CD Track 01 and so on.
If you typed in (or if freedb happened to give you proper track titles) - eg "Chapter 1 - The Saga Begins", or "Chapter IV Onwards They Go!" these will be saved in the title tag as well as in the name.
It's not worth leaving off the "TK %track%" part to get cleaner filenames, so stick with the setting above.
Later when converting ripped tracks to chapters within an audiobook you can rename every track sequentially, use the text from freedb (or gracenote if you use itunes), or you can even type in new text at that point.
What is a major pain later if if you can not use the names here to sort the files into the correct order.
I don't think it's worth spending a lot of time specifying the track titles, for each CD (I'm looking at a box set of 37 disks right now - with no track listing anyway).
Also in my experience I've not found freedb very complete or accurate for audiobook CD's.
- But, as I have noticed itunes/gracenote doing rather better thanfoobar2000/freedb I have updated this guide with details on using itunes to do the ripping.
- I use itunes if it shows useful information, but foobar/nero otherwise.
Select the text in the Preset name at the top (the default is probably "[last used]", and type "audiobook" to replace it. Then hit "Save".
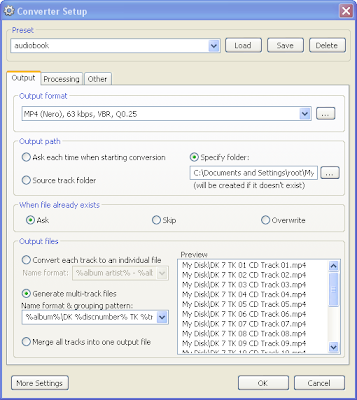
You have now defined a preset! We are nearly done...
Click OK and foobar2000 pops up a box to ask where it can find the neroaacenc program (as it has never used it before).
as you have never used the neroaacenc program with foobar we have to tell it where it is to be found. We can use the copy in C:\Program Files\ipodABC so just browse to there and click the Open button:
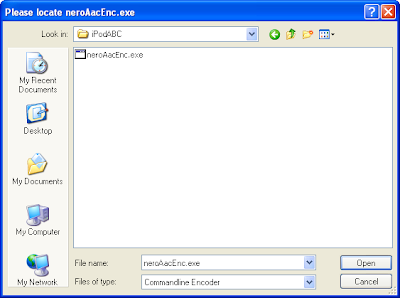
foobar2000 will start converting the CD, you can hit abort on the progress dialog (unless you want some files to practice with). You now have the tools all installed and ready to go.
Now you can do some ripping from a set of CD's ...
Chapter and verse is simple and high compression rate
ReplyDeleteThe link to ipodABC is broken. Steven Haley dot com is not registered anymore.
ReplyDelete